I thought I’d write a tutorial aimed more at beginners, teaching you how
to achieve the all important glowing effect which people can’t seem to
get enough of. Here we will create a style I’ve named ‘Scanline Text’
which is basically text which glows like bright scanlines, with a smart
reflection as well. So learn out how to create this amazing yet simple
effect with this easy to follow tutorial.


Introduction
Glowing effects are everywhere, I even wrote another tutorial on getting the effect which you could combine with this one. I wanted to write this as most of my tutorials are aimed towards intermediate or advanced Photoshop users whereas this is purely beginner but I’m sure You’ll all learn something from it. This is my first tutorial to adopt User Images so make sure you upload the result you get once you’ve finished.Step 1
Create a new document with dimensions; 1x20px, this will the document we create our scanline pattern in. Go Edit>Preferences>Grid then set the grid to every 1px with 1 subdivision. Create a new layer then hide the background layer. Select the rectangle tool and change the foreground color to white. Now draw a 1x2px rectangle in the middle of the document like in the image below. Go Edit>Define Pattern and save this as a pattern. You can now close this document.Step 2
Create a new document with dimensions; 1000x1000px then select the gradient tool and open the gradient editor. Use a gradient going from a dark color to black, I used a dark purple. With the gradient set at radial, drag from the middle of the document outwards.Step 3
Use the text tool to type something in the middle of the document in white. Now go Window>Character then change the settings to suit, for example I used Times New Roman, 300pt and tracking of 100. It should now look similar to the image shown below. Now create a new layer then hit Alt+Backspace to fill it with the foreground color; it doesn’t matter what this is. Ctrl+click on the text layer to make a selection around the text, with the new layer we just created still active click the layer mask button in the layers panel. Now hide the text layer then select the layer mask you just added and go Filter>Blur>Gaussian Blur and use a value of 10px. Set the fill opacity of this layer to 0%.Step 4
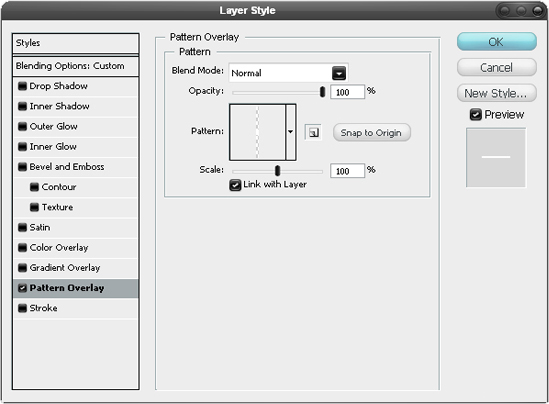
Right click on this layer and select blending options, us the settings shown below to add a pattern overlay using the pattern you created earlier.Step 5
You can now alter the opacity of this layer to suit you but I always end up going back and changing settings like this later on so don’t worry if it doesn’t match mine exactly.Step 6
Create some more text like shown in the image below, here I used an even larger value for the tracking because I find that serif fonts in uppercase look better when the characters are spaced out. Again make them white.Step 7
Right click on this text layer and select blending options then add an inner shadow and outer glow with the settings shown below. If you used a color other than purple for the background you may want to use colors with a different hue for both of these for example; cyan for a blue background. Things like this can easily be changed later on anyway.Step 8
Put both of the these visible layers within a new layer group then duplicate this group.Step 9
With the new layer group selected, go Edit>Transform>Flip Vertical then hit V to select the move tool then move it down so it starts to look like a reflection.Step 10
With the reflection layer group still selected click the layer mask button then with the mask selected use the gradient tool to draw a gradient going from black to white, from the bottom of the reflection to the top of it. If you did this correctly, your image should resemble the one shown below.Step 11
Create a new layer then hit D to reset the colors then go Filter>Render>Clouds.Step 12
Hit Ctrl+T to enter free transform mode then squash the image down vertically then goe Edit>Transform>Perspective and move the handle at one of the bottom corners outwards. Next go Filter>Blur>Gaussian Blur and use a value of 10px.Step 13
Change the opacity of this layer to 10%.Step 14
Create a new layer, select the brush tool and using a soft brush, make some brightly colored strokes like shown in the image below.Step 15
Add a Gaussian blur to this layer with a value of 100px then change the opacity of this layer to 50%.Step 16
Now just change the blend mode to color. I went back and tweaked a few settings to do with color and opacity mainly and below is my final result.
No comments:
Post a Comment